个人搭建的V2ray/Xray梯子,
在访问 Google.com 或者 YouTuBe.com 的时候
偶尔会提示:异常流量,需要进行人工验证,非常烦人!
由于我的VPS不支持 IPv6 ,使用 HE 的 IPv6 隧道解决 !
💖注册 HE 创建 IPv6 隧道
注册账号
访问 https://www.tunnelbroker.net/
点击 左侧 Register 注册 账号
通过邮箱验证邮件之后,登录账号。
创建 IPv6 隧道
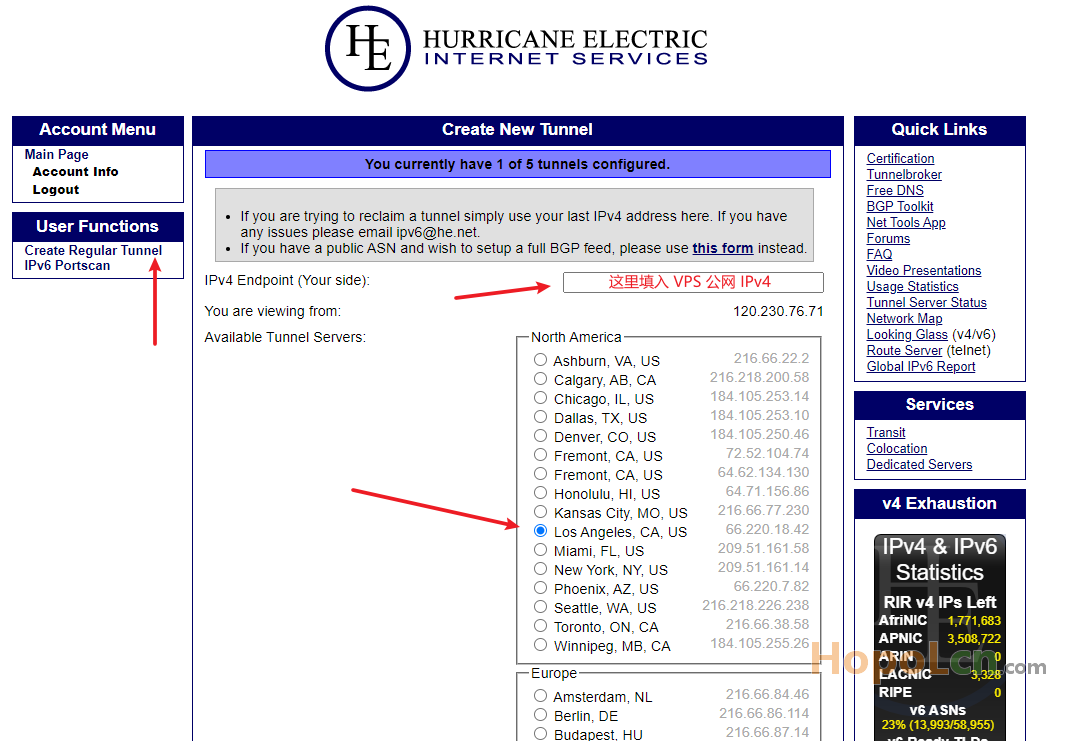
点击左侧 Create Regular Tunnel ,创建 IPv6 隧道。
IPv4 Endpoint (Your side):填入VPS公网IP
Available Tunnel Servers:根据VPS所在地选择(可以登录ssh ping 一下后面的IP测试)
因为我VPS 是 LA 线路,这里选择 Los Angeles, CA, US。
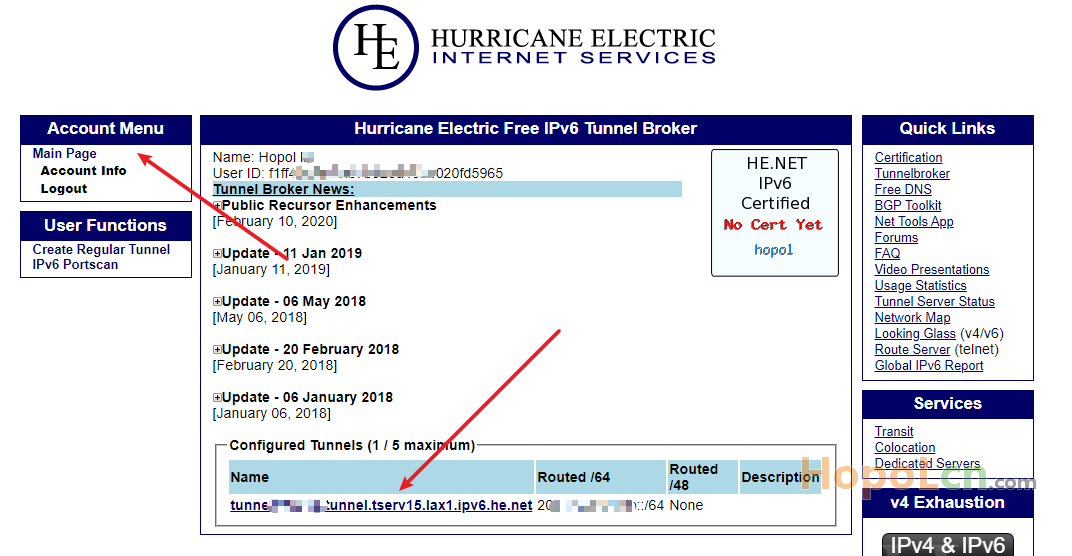
选好之后,下拉页面点击最底下的 Create Tunnel 。
获取配置
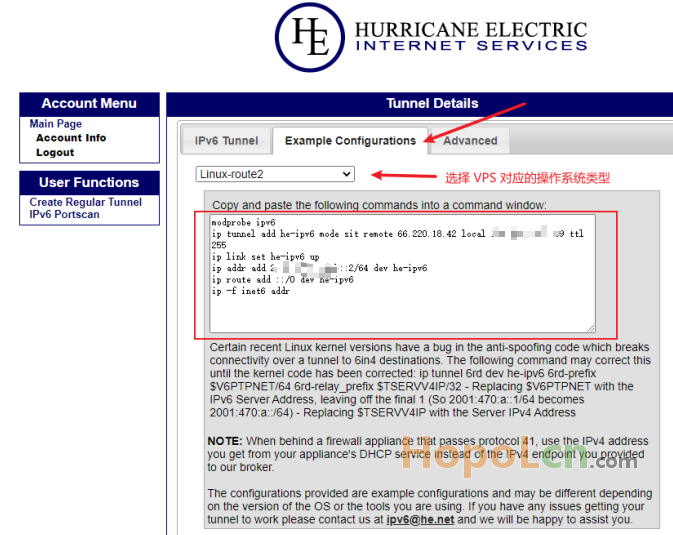
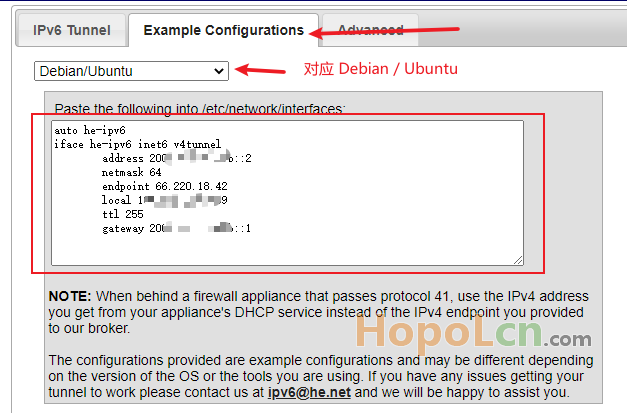
点击 Example Configurations 页面 ,选择对应的操作系统类型。
CentOS 需要选择系统类型: Linux-route2
由于我 VPS 使用的是 Debian 10 ,所以。。。
VPS 配置 IPv6隧道
VPS 修改 sysctl
vi /etc/sysctl.conf
在最底部 增加如下三行:
net.ipv6.conf.all.disable_ipv6 = 0
net.ipv6.conf.default.disable_ipv6 = 0
net.ipv6.conf.lo.disable_ipv6 = 0
保存使设置生效,启用IPv6
sysctl -p
添加 IPv6 DNS 解析
vi /etc/resolv.conf
在底部增加两行
nameserver 2001:4860:4860::8888
nameserver 2001:4860:4860::8844
上面两行是 google 的 ipv6解析 dns,也可自行上网搜索其它的 dns 解析
💎Debian / Ubuntu 下
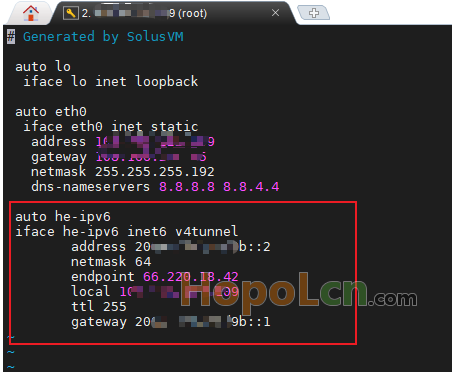
编辑 /etc/network/interfaces
vi /etc/network/interfaces
将获取到的配置信息粘贴进去
重启网络即可生效
/etc/init.d/networking restart
💎CentOS 下
复制 tunnelbroker 上的配置脚本,并粘贴到 SSH 下运行即可
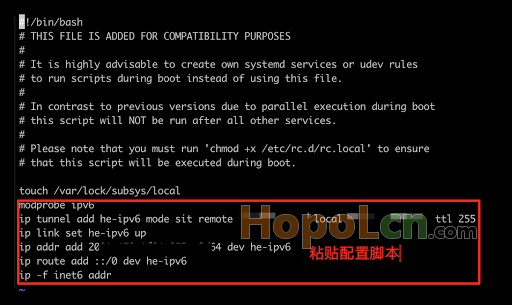
修改系统启动项
上面方法只是执行一次,VPS重启后失效,所以要写入启动设置。
vi /etc/rc.d/rc.local
将 tunnelbroker 得到的配置脚本,粘贴到 底部 保存即可。
测试IPv6
ping6 ipv6.google.com
如果返回正常的结果,则说明 IPv6隧道已经生效。
㊙V2ray / Xray 设置 google 走 IPv6
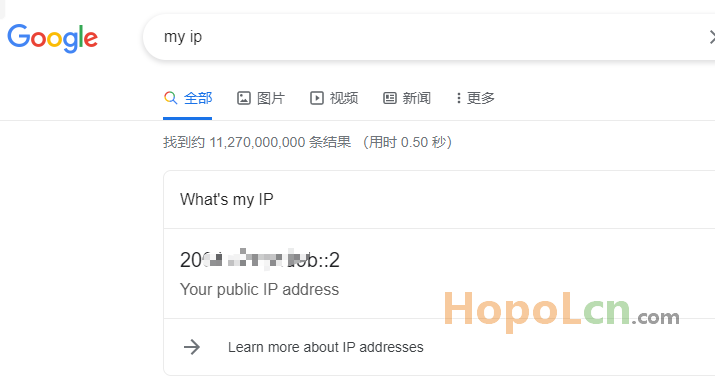
访问 www.google.com 搜索关键词:my ip
其实无需设置,默认走 IPv6 ,但不排除是个别案例。
找到 配置文件 config.json 并添加 如下代码:
{
    "outbounds": [
        {
            "tag": "IPV4_out",
            "protocol": "freedom",
            "settings": {
                "domainStrategy": "UseIPv4"
            }
        },
        {
            "tag": "IPV6_out",
            "protocol": "freedom",
            "settings": {
                "domainStrategy": "UseIPv6"
            }
        }
    ],
    "routing": {
        "rules": [
            {
                "type": "field",
                "outboundTag": "IPV6_out",
                "domain": [
                    "domain:google.com"
                ]
            },
            {
                "type": "field",
                "outboundTag": "IPV4_out",
                "network": "udp,tcp"
            }
        ]
    }
}
V2ray配置文件路径:/usr/local/etc/v2ray/config.json
Xray配置文件路径:/usr/local/etc/xray/config.json
避免一些朋友看不清 大括号,避免报错,可以根据下面的方法替换内容。
找到
"outbounds": [
    {
      "protocol": "freedom",
      "settings": {}
    }
  ]
修改为
"outbounds": [
        {
            "tag": "IPV4_out",
            "protocol": "freedom",
            "settings": {
                "domainStrategy": "UseIPv4"
            }
        },
        {
            "tag": "IPV6_out",
            "protocol": "freedom",
            "settings": {
                "domainStrategy": "UseIPv6"
            }
        }
    ],
    "routing": {
        "rules": [
            {
                "type": "field",
                "outboundTag": "IPV6_out",
                "domain": [
                    "domain:google.com"
                ]
            },
            {
                "type": "field",
                "outboundTag": "IPV4_out",
                "network": "udp,tcp"
            }
        ]
    }
然后,重启服务
V2ray:
systemctl restart v2ray
Xray:
systemctl restart xray
--- End ---


